This text provides a comprehensive guide to crack repair on foundation slabs, focusing on identifying crack types, assessing severity, and selecting appropriate repair methods. Key points include recognizing hairline cracks as normal shrinkage, wider cracks as structural issues, and the importance of documenting crack locations. Safety protocols, thorough inspection, and adhering to manufacturer guidelines are emphasized for effective and safe repairs. Options discussed include epoxy injection for larger cracks and hydraulic cement for smaller ones. Post-repair care involves regular inspections, cleaning, and sealing to ensure durability. Professional services are recommended for subtle yet concerning cracks, addressing red flags like crack width exceeding 1/4-inch or alignment issues near structural elements.
Foundation slab cracks can be a serious structural issue, but prompt repair is key to maintaining your home’s integrity. This comprehensive guide delves into the world of crack repair, covering everything from understanding crack causes and assessing damage to choosing the right repair method and ensuring post-repair care. Learn about common mistakes to avoid and know when to call a professional for expert intervention. Master the art of crack repair and safeguard your property today.
Understanding Foundation Slab Cracks: Causes and Types

Foundation slab cracks can be a significant concern for any homeowner, but understanding their causes and types is the first step towards effective crack repair. These cracks often result from various factors, including settlement, shrinkage, and movement of the soil beneath the structure. Settlement occurs when the ground below the foundation loses its stability, leading to uneven sinking or tilting of the slab. This can be caused by poor soil conditions, improper construction, or nearby heavy excavations.
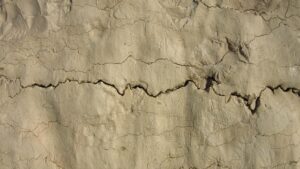
There are several types of cracks that may appear in a foundation slab. Hairline cracks, usually less than 1/8 inch wide, are common and often result from normal concrete shrinkage. Staggered or diagonal cracks suggest more severe movement, potentially indicating structural issues or environmental factors like expansive soil. Large, open cracks with visible gaps indicate significant structural damage and may require emergency attention. Identifying the type of crack is crucial in determining the appropriate crack repair method.
Assess the Extent of Damage: Identifying Crack Patterns

When assessing foundation slab damage, crack patterns are a critical indicator of the issue’s severity. Inspecting the slab for cracks is a crucial step in understanding what type of repair is needed. Thin, hairline cracks less than 1/8 inch wide are typically normal and may simply be signs of natural concrete shrinkage. Wider, diagonal or vertical cracks, however, can signal more serious structural problems.
Focus on identifying crack patterns that extend across the entire slab, as these could indicate settlement or shifting in the foundation. Overlapping cracks or cracks that radiate from a single point are also red flags for potential issues with water damage, heave, or other environmental factors. Documenting crack locations and measurements will help guide the repair process, ensuring targeted and effective crack repair solutions.
Preparation: Safety Measures Before Repair

Before addressing any crack repair, safety should be your top priority. Wear appropriate personal protective equipment (PPE), including gloves, eye protection, and a dust mask, to avoid inhaling concrete dust or other debris. Ensure proper ventilation in the work area, as some repair methods may release harmful fumes. Clear the slab of any furniture, tools, or obstacles to create a safe workspace. If working near traffic or heavy machinery, establish clear communication and safety protocols to prevent accidents.
Inspect the crack thoroughly to determine its severity and cause. This step is crucial for selecting the right crack repair method. Some cracks might require professional intervention if they are wide, deep, or structural in nature. Regular maintenance, such as regular cleaning and sealing, can help prevent future cracks from forming due to moisture ingress or shifting loads. Always follow manufacturer guidelines when using any repair products to ensure optimal results and safety.
Choosing the Right Repair Method: Epoxy Injection vs. Hydraulic Cement

When it comes to repairing a foundation slab, selecting the appropriate method is paramount for ensuring long-lasting results. Two popular techniques are epoxy injection and hydraulic cement, each with its advantages for specific crack repair scenarios. Epoxy injections offer exceptional strength and resistance to chemicals and moisture, making them ideal for larger cracks that compromise structural integrity. This method involves injecting a liquid epoxy mixture into the crack, filling it completely and hardening to create a robust bond.
On the other hand, hydraulic cement is a versatile option suitable for smaller cracks and surface repairs. It sets by absorbing water from the surrounding environment, expanding as it hardens to fill gaps effectively. While not as strong as epoxy, hydraulic cement provides a cost-effective solution for minor crack repair, restoring the slab’s stability without significant structural reinforcement. The choice between these methods depends on the crack’s size, severity, and the desired level of durability required for the foundation slab’s long-term performance.
Step-by-Step Guide to Crack Repair Process

Crack repair on a foundation slab is a crucial process that requires careful navigation and precision. Here’s a step-by-step guide to help you tackle this task effectively. Begin by identifying the extent of damage; carefully examine the cracks, noting their size, depth, and pattern. Next, prepare the area by clearing it of debris and ensuring proper ventilation to prevent hazardous dust accumulation. Mix a suitable epoxy or polymer-based repair compound, following the manufacturer’s instructions for the ideal consistency.
Using a putty knife, apply the repair compound into the cracks, filling them completely. Smooth the surface with the knife to ensure an even finish, slightly above the slab’s original level. Allow the compound to cure fully; this process may take several hours or as indicated by the manufacturer. Once cured, lightly sand the repaired area to achieve a flat and seamless blend with the surrounding foundation.
Post-Repair Care: Ensuring Longevity and Structural Integrity
After a crack repair, proper post-repair care is essential to maintain the longevity and structural integrity of your foundation slab. This includes regular inspection to monitor any new cracks or signs of damage, as well as implementing preventive measures like ensuring adequate drainage around the structure to avoid water seepage.
Regular cleaning and sealing of the repaired area are crucial to protect against moisture and contaminants. Use a mild detergent and a soft brush to clean the surface, then apply a high-quality sealant to create a protective barrier. By following these steps, you’ll ensure that your crack repair holds and that your foundation slab remains strong for years to come.
Common Mistakes to Avoid During Slab Repair

When undertaking foundation slab repair, it’s crucial to avoid common mistakes that can compromise the integrity of your structure and lead to costly regreat. One frequent error is attempting DIY repairs without proper knowledge or experience. Foundation slabs are complex systems, and incorrect techniques can result in further damage or an unstable base.
Another mistake to steer clear of is neglecting regular inspection. Cracks, though initially small, can signal underlying issues that, if left unaddressed, will worsen over time. Prompt crack repair is key to preventing more extensive and expensive repairs down the line. Always opt for professional services when dealing with foundation slab repairs to ensure longevity and structural soundness.
When to Call a Professional: Signifying Red Flags

If you notice subtle cracks forming in your foundation slab, it might be time to consider crack repair services. While minor cracks can sometimes be addressed with DIY methods or simple structural adjustments, there are clear red flags that indicate when professional intervention is necessary. One of the primary signs is the width and depth of the cracks; if they exceed 1/4-inch (or 6 mm) in width or show signs of widening over time, it could be an indication of a more significant structural issue.
Another crucial factor is the location of these cracks. If they are appearing near doors, windows, or walls that are out of alignment, or if you notice uneven floors or sinks, these are severe red flags. Such issues often point to problems with soil settlement or underlying structural damage, requiring expert evaluation and repair, particularly for crack repair in areas like slabs that bear the weight of a structure.